
Do you see what I see? Pinhole Camera STEM Challenge
Post by Claire Meschkat
Originally Posted: March 11, 2022
Updated: March 2024
Are you looking to add more science to your engineering design challenges? Watch the video below for some cool demos to share with your students followed by an engineering design challenge on how to construct a pinhole camera that demonstrates "camera obscure.” We also have a complete lesson plan connecting the challenge to the innovation of the light bulb in England!
The purpose of this project is to first have students observe the reflection and refraction of light, and then to have students make their own pinhole camera to demonstrate camera obscura.
Background
Studying light and how it behaves, or optics, is important in making sense of what we see. Reflection is the change in the direction of a light wave to return to the source from a surface. Refraction is when the light wave changes direction as it passes through a change in a medium. The foundational optical principle on which modern cameras were built is called camera obscura. This consisted of a pinhole in a dark enclosure that allowed for an image to be projected inverted and reversed onto the back of the enclosure. This allowed early artists to draw or trace images in perfect perspective.
Students will understand different techniques in manipulating light and replicate camera obscura by making a pinhole camera.

Science Demo on Reflection and Refraction
In this science lab, you will need:
Water: You will need a large jar of water ready. The jar should have smooth, round, clear sides. Have a plastic straw and a notecard available for the demonstration.
Spoons: Provide a metal, reflective, spoon for each student or pair of students.
Location: Create or find a dark space. Close all classroom blinds. You could also have students test one by one in a closet.
Light source: Use either a lamp without a shade or an iPad or a computer with a simple, recognizable object shining on the screen. For iPads or computers, turn off the screen darkening feature so the light source stays bright while the students get their pinhole cameras working.

Refracted light does some interesting things. Instead of the light being bounced back at you, it keeps going but changes direction as it passes through another substance. Maybe your students have noticed how a straw can look broken when in a glass or water. As light passes from air into water, which is denser, it changes direction, or refracts. This makes the straw under the water appear to be in a different place than the straw under the water. Watch the video for the complete lab demo!
Engineering Challenge
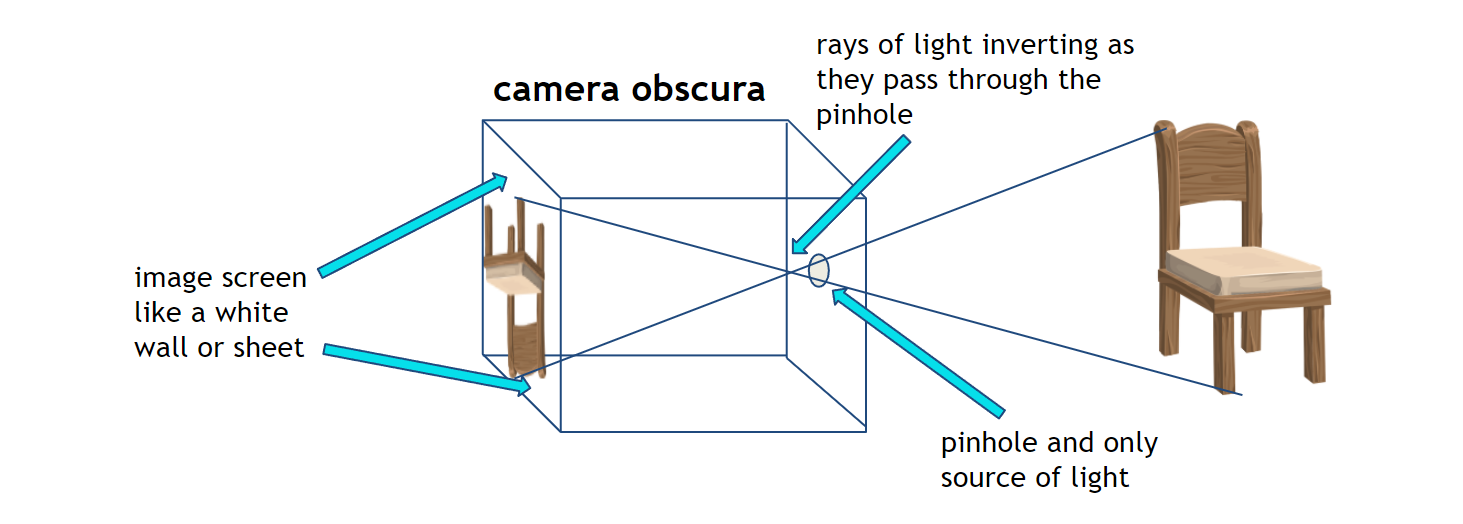
The way camera obscura works, sending light through a pinhole, causes the light to reflect an inverted image as the opposite end of the light ray is displayed on the image screen.
You can see in the picture below how the bottom of the chair reflects up on a light ray to the top of the image screen, while the top of the chair reflects down on a light ray to the bottom of the image screen. Pretty cool that someone figured this out and created a camera obscura! The first camera obscura was huge. The name actually means dark room and it literally was a full room. Over time scientists and engineers have learned how to bend light and innovate cameras that use this original idea from the camera obscura.
Watch the video for the details on the engineering design challenge for a pinhole camera that projects an image on the image screen. Here are are some troubleshooting tips if the pinhole cameras are not working:
Remind students to move around slowly until they see the image. It will take a few tries before they see anything.
If students are still seeing nothing, then make the pinhole just a tiny bit bigger. Go slow as you can always make it bigger again but can’t make it smaller.
Last resort: students can make a camera hood using a coat, sweater or beach towel covering their head and camera leaving only the pinhole out.

Try this challenge with your students!
This science lab and challenge is part of the STEM Explorers unit on the England Pinhole Camera.
Take your students on an educational journey to England with this STEM lesson! Read the letter from fictitious travel guides explaining the innovation of the light bulb in England which led to the use of light bulbs in homes and theaters. Students will learn about light refraction and camera obscure as the foundation of how optics work like our eyes and a camera. Then students will complete an engineering design challenge to build a pinhole camera to project an image on their pinhole image screen. Related math problems extend the learning fun!
